Getting going with bullet journalling is as easy as making a prototype journal!
Details follow — below this stunning photography…


Step 0: Print the paper
Head over to incompetech and create a sheet of paper (in PDF file format) of a type that suits you. For example, my settings were:
- PDF Document Size: A4 (21 x 29.7cm)
- Minimum Border: 0.25 inches
- Grid Line Weight: 0.50 points
- Accent: (None)
- Grid Spacing: 2 lines per cm
- Grid Color: Light Blue
Download and print out two sheets from the PDF file. Then, make back-to-back copies of these so that you end up with double-sided pages. You’ll need at least 10 pages; I made my booklet from 16.
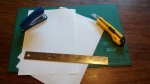
Step 1: Get your stuff together
I used some fairly basic hobby tools: a clean cutting board; a sharp hobby knife; a standard stapler; and a metal-edged ruler (cork-backed to keep it from slipping). A flat, stable work-surface is also very helpful.
Step 2: Fold the paper
Fold each piece individually in half (TIP: use the metal ruler to create a sharp crease). When done, nest them all together to form the basic booklet.
I’d also suggest folding a blank piece of paper, or thin card (of the same size), to act as a cover.
Step 3: Staple the booklet
Lay the booklet out flat again, with the cover page topmost. The ‘ridge’ of the fold should be uppermost and clearly visible. Now open out the stapler, locate a point on the fold about ¼ of the way in from the long edge, and push a staple in (along the line of the fold). Do the same on the opposite edge. Now flip the booklet over and carefully push down the “legs” of the staples so that they lie flat along the direction of fold.
TIP: If the board is too firm to push a staple into it, do this on an (old!) carpet.
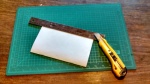
Step 4: Trim the edge of the booklet
Once folded, you will see that, unlike a real book, the page widths all seem different and its hard to ruffle the pages — this is a side-effect of the folding process. Trimming off a strip — about 2mm in from the edge of the top-most page — will create a clean square edge, but still minimise how much paper you waste.
Step 5: Trim the corners of the booklet
Not really needed, but cutting a few millimetres off the corners prevents them from bending or creasing in an annoying way.
Step 6: Admire your handiwork…
Yes, you’re done — pat yourself on the head (but not too hard).
Um … but why?!
You’ve probably read elsewhere how everyone buys incredibly expensive books to start bullet journalling — and, yes, mine is on order too — but there is something really helpful about creating a ‘throw away prototype‘ version:
- quick and cost-effective to create
- can be messed up without any worries
- helps generate ideas for real version
- if it does not work out … has cost only a bit of your time!
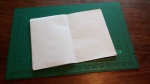
OK, but does it work in practice?
I used this booklet for about two weeks and scribbled all over it (mostly in pencil), trying various layouts without any fear of messing up a ‘real’ version (read ahead to Part 2). It gave me a chance to experiment and discard freely.
Below is one example, showing an somewhat “blocky” weekly layout that I tried & discarded, plus some “drafts” for the daily layout.


[…] Prototyping my life: Part 1 […]
LikeLike