Boxes vs Lists

One aspect of bujo I am slowly coming to appreciate is the power of lists.

You can look at a more traditional planner as a series of boxes into which you put things; for example, each day on the calendar has a little box to itself.  This has its pros but also its cons. Its very neat and tidy but also somewhat restricting: what if only two things happens on day one, but twenty on day two, then nothing happens for the next three— now all that blank space starts to look a little bare, if not actually messy.

A bullet journal, on the other hand, is almost completely open-ended.  A list has no clearly defined end— which can give it an unfinished look— but that also means it imposes no restrictions on you whatsoever.  The “mandate” to allow lists to spill-over across pages— wherever they are— and then thread them all together – is a very liberating concept.

When I was thinking about “improved” future planning for the weeks ahead, my first instinct (as a “newbie”) was to create a whole series of boxes— quite tiny boxes!  I started writing teeny-tiny notes into them and also started worrying about running out of space.  Then it hit me—  there is an unlimited amount of space in my journal (…and its successors) so why am I cutting myself off from it??

Toss out the boxes— break out the lists!

Image Credit: Nadina Wiórkiewicz pl.wiki: Nadine90 commons: Nadine90 [CC BY-SA 3.0 (http://creativecommons.org/licenses/by-sa/3.0)%5D, via Wikimedia Commons
Boxes vs Lists

Prototyping my life: Part 2

In Part 1, I discussed how I was using a prototype bullet journal to test out various ideas.  After about two weeks, I decided I need to start with the Real Thing.  This, then, is my approach to bullet journalling for the immediate future.

The Big Picture

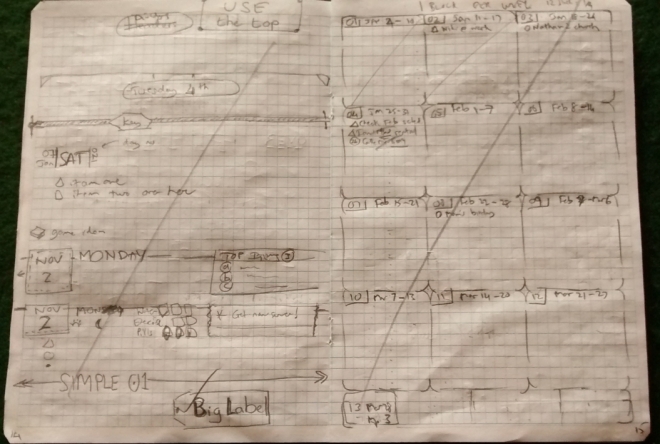
er, actually, a few small pictures… not great quality, but hopefully readable.


The Key Keys

I have discovered that drawing squares – the standard notation for a task – is really tricky for me (please, don’t smirk!); they end up looking like squashed circles. For this reason, I am switching to triangles—they remind of a mini-mountain I need to climb — and use normal practices for task handling.

Primary Keys

Δ — task to be done (shaded when done; partial shade for started; arrow strike-through when migrated)

ο — event or activity (shaded when complete;  ⊕ when event added to Google diary)

• — normal note

I will underline the triangle when its a work-related task.

The signifiers I will probably grow over time: ∗asterisks for important items; ♥hearts for like/fave; and $dollar signs for finance will be a good start. And smilies – smilies are good!

Headers to the left … Headers to the right

One of the great joys of books is being able to flip through them to quickly get to a particular page. Your eye-brain combination is really good at pattern detection and so finding that previously stored “page image” is easy, even if you don’t recall all the details.

For this reason, I have decided to try and put headers for days at the outer-edges of each page; this will enable a quick flip to more easily pick up a particular date.

I will also try and add small top-corner headers for some of the more commonly used collections.

The Infamous “Future Plan”

No plan survives contact with the enemy. Helmuth von Moltke

In our daily lives, the future is the enemy.  It throws changes at us with monotonous—some even might say predictable— regularity.  Bullet journalling emphasises fast, light, “on the move” planning, for which it has been criticised by some.

The approach I will try is as per the image above i.e. a “mini me” section at the start of the journal, with a half-dozen pages for tasks or events in upcoming months.   Where dates are known, I will add those (probably as circled numbers).

As each month rolls around, I will migrate these items into the detailed month plan, and then down to the detailed weekly plan, as per standard bullet journalling practice.

A Labour of Lists

Bullet journalling suggests you just start a new page wherever you are as you start a new list or collection or date-based entry, and then index it (and possibly thread it).  But nothing says this all has to happen in one place or in a specific sequence.

My approach will be to add date-based entries from the start as normal; but add collections /  lists from the back of the journal.  This has the advantage that my date index does not have to be updated every time I add a new collection.

Last Updated On…

One of the issues that people raise with bullet journalling is the risk of not having your information “backed-up” as it would be with a digital file.  I have decided to try and create a weekly copy with my smartphone camera.  The date-based pages will change with, well, date; but for collections its trickier.

For this reason, I am adding a “week number” entry along the bottom edge of a collection page that signifies when it was last changed – so I do not need to take a photo every week.

rndm ideas

Some random ideas culled from the interwebs that I may or may not try out:

  • Put an ‘x’ next to a page number if that topic has been retired or migrated
  • Keep colors to a minimum; not a dependency but a “nice to have” (e.g. highlighting the weekends on the monthly planner)
  • Practice writing to “write better”


Prototyping my life: Part 2

BuJo Baby Steps

Rome — they say — was not built in a day.  Nor will be my bullet journal.

Implementation Plan

I do not see a bullet journal as the sole single option for life planning and management.  Its a great tool — but with some limits.

Specifically, for managing fixed, date-based events (including recurring ones), a calendar — in my case, the Google calendar — are perfect at scheduling and reminding me. The calendar is integrated with my smartphone so I have a calendar and alert system with me.

Workflow

Plan is:

  1. Set-up my bullet journal (Ryder Carroll’s video)
  2. Tweak design e.g. page layouts, and methods e.g. system of bullets, to fit my needs and context
  3. Transfer my tasks from bits of paper, in-boxes and electronic lists (workflowy, in my case!) into the bullet journal
  4. Create collections of data/lists as needed
  5. Immediately enter any new items (tasks, ideas, etc.) into my bullet journal — as date-based or into master task list or a collection
  6. Regularly (at least daily) review my tasks lists and collections— migrate and delete as needed

Above all – keep it simple & workable!!

What not to do!

In tackling any project, I have learnt that you always try to bite off more than you can chew.  A quick reminder to myself of what to avoid (these work for others, but are unlikely to be for me):

  1. Goal Setting.  I am not goal-driven by nature; my inner life and happiness is driven by good relationships which emerge from my surroundings and work/life activities — not something which is “taskable”.
  2. Decorating.  I admire the multi-colored, doodle-driven, washi-enhanced efforts of many journallers. Admire, but will not copy!
  3. Digitizing.  I am not interested in hybrid systems so creating digital versions of what is a sensible way to manage life at a reasonable level is not something to do.
  4. Duplication.  Daily life is a mixed-up combination of work, home, and personal activities and responsibilities — so having a single bullet journal makes lots of sense.
  5. Project Planning.  Detailed project planning, with long lists of tasks and sub-tasks, plus schedules etc. is not something to tackle in a bullet journal; rather use it to capture brief notes and ideas as inputs the projects. Daily “do it now” tasks can be drawn from the project plan into the journal.

Breaking News…

Its arrived — fresh out of the courier box!

moleskine_gelpen.jpg


BuJo Baby Steps

Bullet Journal Resources

Apart from the official Bullet Journal website, a number of resources have guided me in getting going on the “bujo” journey.


Image Credit: https://upload.wikimedia.org/wikipedia/commons/thumb/a/a8/Woodpile.JPG/1024px-Woodpile.JPG


Bullet Journal Resources

Prototyping my life: Part 1

Getting going with bullet journalling is as easy as making a prototype journal!

Details follow — below this stunning photography…

Step 0: Print the paper

Head over to incompetech and create a sheet of paper (in PDF file format) of a type that suits you. For example, my settings were:

  • PDF Document Size: A4 (21 x 29.7cm)
  • Minimum Border: 0.25 inches
  • Grid Line Weight: 0.50 points
  • Accent: (None)
  • Grid Spacing: 2 lines per cm
  • Grid Color: Light Blue

Download and print out two sheets from the PDF file.  Then, make back-to-back copies of these so that you end up with double-sided pages.  You’ll need at least 10 pages; I made my booklet from 16.

Step 1: Get your stuff together

I used some fairly basic hobby tools:  a clean cutting board; a sharp hobby knife; a standard stapler; and a metal-edged ruler (cork-backed to keep it from slipping).  A flat, stable work-surface is also very helpful.

Step 2: Fold the paper

Fold each piece individually in half (TIP: use the metal ruler to create a sharp crease).  When done, nest them all together to form the basic booklet.

I’d also suggest folding a blank piece of paper, or thin card (of the same size), to act as a cover.

Step 3: Staple the booklet

Lay the booklet out flat again, with the cover page topmost.  The ‘ridge’ of the fold should be uppermost and clearly visible.  Now open out the stapler, locate a point on the fold about ¼ of the way in from the long edge, and push a staple in (along the line of the fold). Do the same on the opposite edge.  Now flip the booklet over and carefully push down the “legs” of the staples so that they lie flat along the direction of fold.

TIP: If the board is too firm to push a staple into it, do this on an (old!) carpet.

Step 4: Trim the edge of the booklet

Once folded, you will see that, unlike a real book, the page widths all seem different and its hard to ruffle the pages — this is a side-effect of the folding process.  Trimming off a strip — about 2mm in from the edge of the top-most page — will create a clean square edge, but still minimise how much paper you waste.

Step 5: Trim the corners of the booklet

Not really needed, but cutting a few millimetres off the corners prevents them from bending or creasing in an annoying way.

Step 6: Admire your handiwork…

Yes, you’re done — pat yourself on the head (but not too hard).

Um … but why?!

You’ve probably read elsewhere how everyone buys incredibly expensive books to start bullet journalling — and, yes, mine is on order too — but there is something really helpful about creating a ‘throw away prototype‘ version:

  • quick and cost-effective to create
  • can be messed up without any worries
  • helps generate ideas for real version
  • if it does not work out … has cost only a bit of your time!

OK, but does it work in practice?

I used this booklet for about two weeks and scribbled all over it (mostly in pencil), trying various layouts without any fear of messing up a ‘real’ version (read ahead to Part 2).  It gave me a chance to experiment and discard freely.

Below is one example, showing an somewhat “blocky” weekly layout that I tried & discarded, plus some “drafts” for the daily layout.

prototype_messy_tests
Messy test pages in prototype journal


Prototyping my life: Part 1

Bullets & Books

Q: When can a bullet save your life…?

A: No; not when it’s fired from your gun!

I am planning on trying out the Bullet Journal approach to “managing my life” and have spent the last few days doing some research around the pros-and-cons,  trying to get an understanding on how and why people are using it.

What is a Bullet Journal?

A bullet journal is a little bit of everything. It’s kind of a planner, a calendar, a to-do list, and just a journal in general. Plus, the whole project is a DIY kind of process which allows for the bullet journal to be entirely customizable in regards to its decoration, organization, and make-up (The Travelling Curl)

Why a Bullet Journal?

For me?  Well, like many others, I have tried out numerous “life management” tools and systems, both analogue (paper & pencil) and digital (software/electronic) including – but not limited to! – hardback book diaries (large and small); fully customisable ring-bound filofaxes (large and small); stacks of small cards (DIY GTD); on-line tools (from simple to complex) including both smartphone apps and web apps.  I like the approach offered by Getting Things Done but, ultimately, the lack of a ready tools and integration into the rest of my Life caused me to fall off that bandwagon.

So its a full circle back to pen-and-paper – which does make intuitive sense to me as fifty-something, growing up in a pre-digital world, with deep roots in books and fond memories of “holiday diaries”.

Thoughts about Bullet Journals…

Some quick sound bites from around the web that made me think:

  • As much as I’m a gadget geek, I’m also very much a pen-and-paper gal. Maybe it’s that crossing things off, with a pen, is more fulfilling. Maybe it’s that I hate always staring at a screen. Maybe it’s just that I’m old-fashioned.
  • The act of crossing out items after having written them down (in lieu of typing them) takes some sort of psychic weight off my shoulders.  I really can’t explain it.
  • Think of bullet journalling as panning for gold. You throw everything in there so you don’t miss anything, and then you start sifting through, dumping the junk and moving the good stuff somewhere safe.
  • It only works if you have it with you at all times. This means all notes, ideas, brainstorms and plans are all together, in one place. I just know where everything is; in my Bullet Journal.
  • What have I been writing in my Bullet Journal? Whatever seems relevant. Daily steps, notes on calls and meetings, what jobs I’ve applied for, post ideas — anything that I’ll want or need to know later.
  • Start simple.  Follow the original Bullet Journal layout for a month, then experiment with adding things to make it even more personalized for you and your lifestyle.
  • You can do anything you choose. It’s your journal. Paste on sticky notes, paste in pages, use tabs prolifically, as I do, or not. Your bullet journal can be all business, or you may doodle across the pages… it’s up to you.
  • Unlike pre-printed journals and certain religions, if you don’t think the prescribed dogma works for you then change it. Change all the rules. Steal from other methods. I already have. So has everyone who has posted on their blogs, as far as I know.
  • Don’t worry about PERFECTION!  Set the expectation from the start that you’ll make mistakes.
  • Be creative or NOT!  The amazing thing about a bullet journal is it can be whatever YOU want it to be.  Plain and simple works just as well as colourful and fancy.  Ultimately, the Bullet Journal is a productivity tool, so worry about that first.
  • Nice notebooks are “pricey,” and that’s why I bought one: the point of the exercise was to trick myself into using the shiny new purchase to get my moneys-worth… and the trick worked for long enough to hook me into the system.


Bullets & Books